Uncategorized
Fixing Drywall Patch After Water Damage: 5 Steps You Should Know Before Calling Pros
Nov
Water damage to drywall is one of those home emergencies that can leave you feeling overwhelmed and unsure where to start. Whether it’s from a burst pipe, roof leak, or flooding, water-damaged drywall requires immediate attention to prevent further structural damage and potential mold growth.
Before you reach for the phone to call a professional contractor, understanding the basic repair process can help you determine if this is a manageable DIY project or a situation that requires expert intervention. In this comprehensive guide, we’ll walk you through the essential steps to assess and repair water-damaged drywall, giving you the knowledge to make informed decisions about your home repair needs.
By the end of this article, you’ll have a clear understanding of what’s involved in drywall water damage repair, when you can handle it yourself, and when it’s time to bring in the professionals. This knowledge will not only save you time and money but also help you communicate more effectively with contractors if professional help becomes necessary.
I. Stop the Water Source First
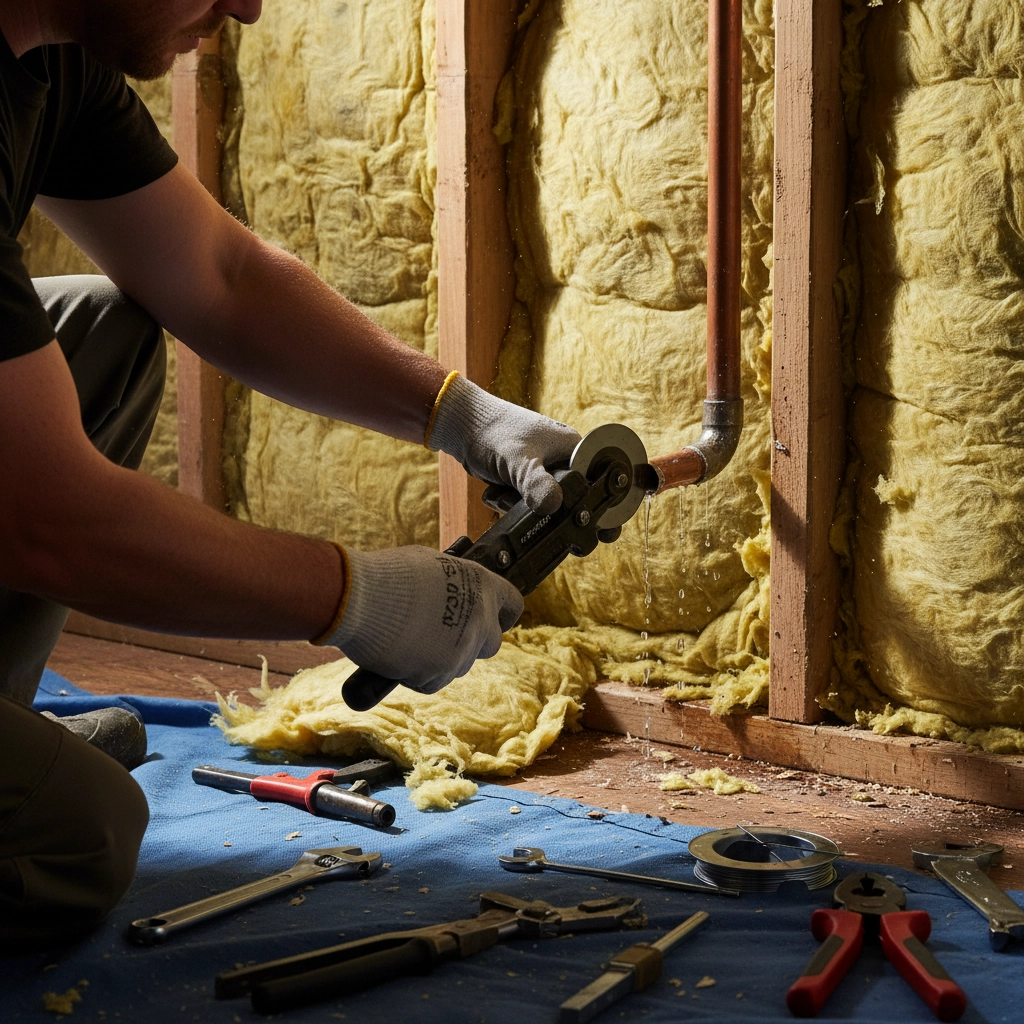
The most crucial first step in any water damage repair is addressing the source of the water itself. This cannot be overstated: no amount of wall repair will help if water continues to infiltrate the area. Even small, seemingly insignificant leaks can cause recurring damage that will undermine all your repair efforts.
To locate the source effectively, you’ll need to cut a hole approximately six square inches in the damaged drywall area. This exploratory opening often reveals the exact location of the leaking pipe section or water entry point. Don’t worry about making this hole larger than necessary at this stage: you’ll be cutting out more damaged material later anyway.
Once you’ve identified the leak source, turn off the water supply to that section of your home immediately. For pipe-related issues, you’ll need to cut out the damaged pipe section and install new pipe and fittings using quality materials appropriate for your specific pipe type. After completing the repair, turn the water supply back on and carefully verify there are no leaks before proceeding with any drywall restoration work.
II. Assess the Full Extent of Damage
Water damage assessment requires a thorough and honest evaluation of your drywall’s condition. This step determines whether sections can be salvaged or must be completely replaced, which directly impacts the scope and cost of your repair project.
Drywall that has lost structural integrity cannot be saved and must be removed entirely. Signs of irreparable damage include:
- Drywall that feels soft or spongy when pressed
- Material that crumbles or disintegrates when touched
- Sections that sag visibly from the ceiling or wall
- Areas with a musty odor indicating possible mold growth
- Extensive discoloration or staining across large areas
For minor water staining or localized damage, you can often cut around the problem area using a keyhole saw or sharp utility knife, creating a clean square or rectangular opening. This targeted approach allows you to preserve the majority of your wall while addressing only the compromised sections.
When assessing damage, inspect beyond the visible area. Water often travels along framing members and can affect drywall sections that appear undamaged from the surface. Use a moisture meter if available, or simply press gently on surrounding areas to check for soft spots that indicate hidden water damage.
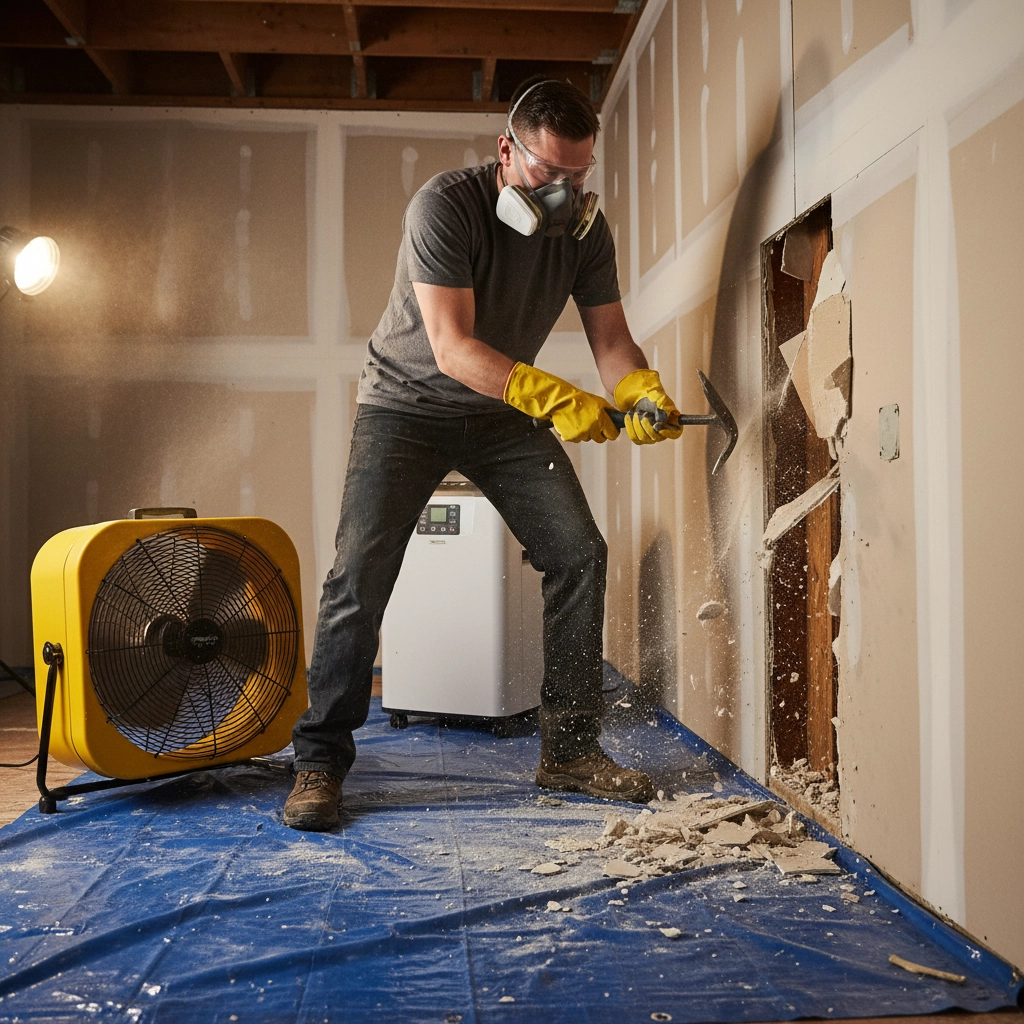
III. Remove Damaged Materials and Ensure Complete Drying
Proper removal of damaged drywall requires careful technique to avoid creating unnecessary damage to surrounding areas. Before beginning removal, set up adequate protection by laying drop cloths or tarps to catch debris and minimize cleanup time.
Safety should be your top priority during this phase. Wear a dust mask to protect your lungs from drywall particles, use rubber gloves to protect your hands, and turn off the circuit breaker to any electrical outlets or switches in the work area. Water and electricity create dangerous situations that require professional electrician assessment if there’s any doubt about safety.
Use the claw end of a hammer or a small wrecking bar to carefully remove damaged drywall sections. Work systematically from the edges of your marked area toward the center, being mindful of electrical wiring or plumbing that may be hidden within the wall cavity.
Complete drying is absolutely essential before installing any new materials. After removal, allow all interior wall components: including insulation, wooden studs, and framing: to dry thoroughly. This process may take several days to over a week, depending on humidity levels, ventilation, and the extent of water penetration.
Accelerate the drying process by using fans, dehumidifiers, and ensuring adequate ventilation in the area. Don’t rush this step: installing new drywall over damp materials will inevitably lead to mold growth and recurring problems that will require complete re-repair.

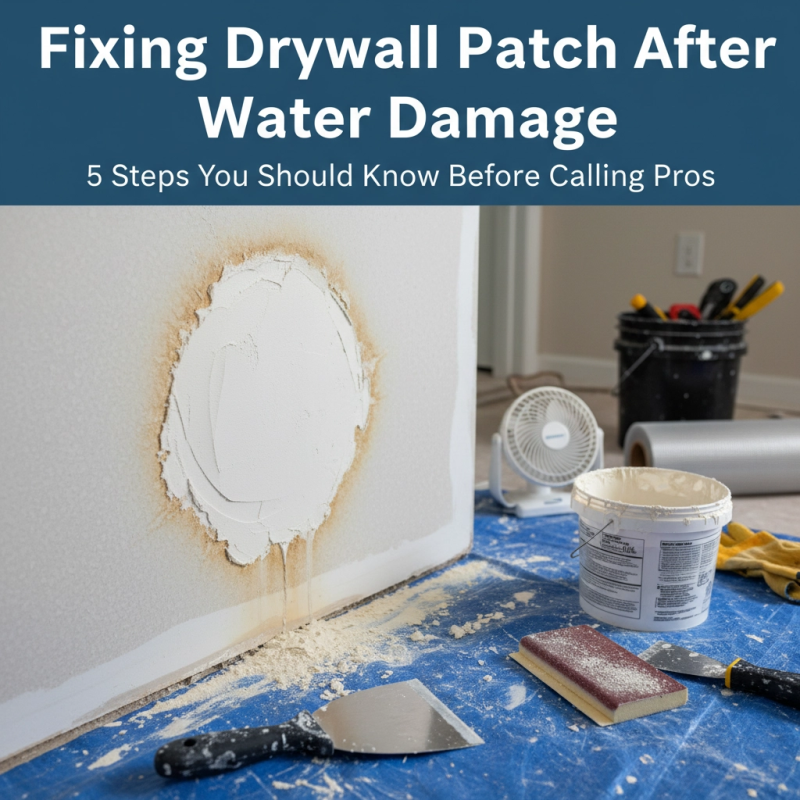
IV. Install Your New Drywall Patch
With the area completely dry and prepared, you’re ready to install a new drywall patch. Proper measurement and cutting are crucial for a professional-looking repair that will blend seamlessly with your existing wall.
Measure the opening you’ve created and cut a new piece of drywall that fits snugly but not so tightly that you have to force it into place. For openings that don’t align perfectly with wall studs, you’ll need to create additional support by attaching small pieces of scrap lumber behind the hole. Secure these support pieces with drywall screws, ensuring they extend at least an inch beyond the opening on all sides.
Position your new drywall patch and check the fit carefully. The patch should sit flush with the surrounding wall surface: not recessed or protruding. Make any necessary adjustments by trimming the edges with a utility knife or fine-toothed saw.
Secure the patch using drywall screws positioned approximately one inch from each edge. Drive the screws just deep enough that the heads are slightly below the surface, but avoid over-tightening, which can break the drywall paper and weaken the installation. Space screws every 8-10 inches along the edges for optimal support.
V. Apply Professional-Quality Finishing
The finishing phase separates amateur repairs from professional-quality results. This multi-step process requires patience and attention to detail, but following proper technique will create a repair that’s virtually invisible once complete.
Begin with mesh tape application around all patch borders. Center the tape on each seam to ensure equal coverage on both sides. Mesh tape provides superior adhesion and helps prevent future cracking compared to paper tape in patch situations.
Apply your first coat of joint compound over the tape and entire patch area. Use a wide putty knife or taping knife to spread the compound evenly, feathering the edges so the repair blends gradually into the existing wall surface. The goal is to create smooth transitions that won’t be visible once painted.
Allow the first coat to dry completely according to manufacturer instructions: typically 24 hours in normal conditions. Sand the dried compound lightly with fine-grit sandpaper to remove any ridges or imperfections.
Apply a second coat of joint compound, extending it slightly beyond the first coat to ensure complete coverage and smooth blending. This coat should create a level surface that matches the surrounding wall texture. Sand again after complete drying.
For the final step, prime the repaired area with a high-quality primer designed for drywall. This prevents the joint compound from absorbing paint differently than the surrounding wall, which would make the repair visible. Finish with paint that matches your existing wall color, applying thin, even coats for the best results.
When Professional Help Becomes Necessary
While many homeowners can successfully handle minor water damage repairs, certain situations require professional expertise for safety and quality reasons. Extensive water damage that affects large wall areas or multiple rooms is typically beyond DIY capabilities and requires specialized equipment and techniques.
Structural concerns should always involve professionals. If water damage affects load-bearing walls, ceiling joists, or floor systems, a structural engineer may need to assess the damage before any repairs begin. Additionally, if you discover electrical damage during your assessment, hire a licensed electrician before proceeding with any work.
Mold contamination is another clear indicator that professional help is needed. If you notice musty odors, visible mold growth, or if the water damage involved contaminated water (such as sewage backups), professional remediation specialists have the training and equipment to handle hazardous conditions safely.
Time constraints can also make professional help worthwhile. Restoration companies have specialized tools like industrial dehumidifiers, air movers, and moisture detection equipment that can significantly accelerate the drying process and prevent secondary damage.
Final Considerations for Successful Repair
Quality materials make a significant difference in long-term repair success. Invest in moisture-resistant drywall for areas prone to humidity, high-quality joint compound, and proper mesh tape. These materials cost slightly more upfront but provide superior durability and performance.
Consider the time investment required for proper repair. Between drying time, multiple coats of joint compound, and curing periods, a complete repair typically takes one to two weeks. Factor this timeline into your planning, especially if the damage affects frequently used areas of your home.
Document your repair process with photos and keep receipts for materials and professional services. This documentation can be valuable for insurance claims and future reference if additional issues arise.
Understanding these five essential steps gives you the knowledge to approach water-damaged drywall repairs with confidence. Whether you decide to tackle the project yourself or hire professionals, you’ll be equipped to make informed decisions and ensure the work is completed properly. Remember, taking time to do the repair correctly the first time prevents costly and frustrating problems down the road.